Every house has that one room (well, sometimes more than one) that becomes a dumping ground. Maybe in your home, it’s an extra bedroom, the garage or even a dedicated storage room.
It can start off so innocently. You store all the seasonal decorations, extra home decor and other miscellaneous items there. Then, over time, it morphs into the spot where you throw all the things you just don’t know what to do with.
After a while, this area becomes a monster. You don’t know what’s in there. Everything is buried in bags or boxes. Nothing’s organized and you’re pretty sure you heard something moving inside that room that shouldn’t have been there.
When a room gets to this point, just the thought of decluttering is pretty overwhelming. It’s a big task — one that you don’t have the time for and don’t really want to do.
I know this feeling first-hand. There was a spot in my parent’s house that I’ve been thinking about cleaning up for years. My parents are older and just not up to the task of dealing with such a huge job.
So, I finally put my big girl pants on and just got to it. I’m going to share some of my best tips for clearing clutter so you’ll know just how to clean out the junk room in your house. And, at the end of this post, I’ll also share some declutter before and after photos of the space that I cleaned out.
How To Clean Out A Room Full of Junk
This post contains affiliate links. If you click and make a purchase, there’s absolutely no extra cost to you. Read my full Disclosure Policy here.
1. Make A Plan
First thing’s first, make a plan of attack.
I’m busy, you’re busy and I’m sure you don’t have a ton of time to dedicate to cleaning out the junk room. So, when will you do it?
Take a look at your schedule and figure out when’s the best time for you to start decluttering this space. For me, I did it after I came home from work, finished cooking and before I went to the gym. So, this only left me with half an hour to an hour most days.
Don’t wait until you have the whole day because this is a pipe dream for most people.
If you have younger kids, do it before they wake up. Alternatively, get someone to watch them, if you can or give them something to do so you can concentrate for a little while.
2. Gather Your Supplies
You’re going to need a few things to get this clutter clean-up rolling. Here’s what I recommend:
- Trash bags
- Empty boxes
- Post-It notes
- Sharpie / pen
- Cross-cut shredder
- Vacuum Cleaner or broom and dustpan
- Mop and bucket
- Microfiber cleaning cloths
- All-purpose cleaning solution
- Timer (optional)
3. Set Up Stations
Make labels using the sticky notes:
- Donate
- Sell
- Keep
- Belongs Somewhere Else
Create separate stations using the labelled Post-It notes. This can be as simple as sticking them onto boxes, if you have a lot of small items. You can also put them on the floor or a wall. You decide the best place to attach the labels.
I found it easier to set up these stations just outside of the storage area I was cleaning.
There will be another station for trash but I think the giant garbage bags are enough of a signal. You can label yours if you want to, though. You can also set up multiple trash stations for recycling. Just do what feels right to you.
4. Go Ahead And Start Decluttering
If you have a lot of rubbish that needs throwing away in your junk room, start with that first. Looking at a smaller pile of clutter helps you to see the progress you’re making which will keep you motivated. Also, doing this frees up more space for you to work in.
Pick a spot closest to the entrance so you’re working your way into the mess and clearing a path as you go. Sort through the clutter and throw away anything that:
- Is broken (don’t pretend you’re going to actually get it fixed either. Just get rid of it.)
- Is old and of no use to anyone. I found plenty of shoes that fit this category. They’d been there for years and some were literally dry-rotten and falling apart.
Shred paper clutter with your personal information on it. A cross-cut shredder is adequate for most homes.
Sort anything that’s not trash and put by the corresponding label — Keep, Donate, Sell and Belongs Elsewhere.
5. Time Yourself
In my case, I had a lot of boxes and a few plastic bags to sort through. I used these as my timer of sorts. I just grabbed one or two boxes or bags and sorted through them as fast as I could. When those were done, I moved on with my life until the next day when I had time to come back to the space again.
Your junk room might be piled high with loose items so it might be necessary to set a timer instead. Use your phone, an actual timer or even your microwave clock.
Sorting through clutter for hours on end isn’t fun for most people so setting a time limit is a great way to prevent you from getting burned out.
6. Be Ruthless When You Clear the Clutter
Move quickly when you declutter your junk room. The longer you sit and ponder things, the longer this process will take and the more likely you are to hold on to things you don’t really need.
It will be hard to let go of mementos but here are some tips that will help you to get rid of sentimental clutter. Set these things aside and come back to them later, if you need to.
7. Group Like Items
As I sorted through the stuff in my parent’s storage space, I grouped similar items together. Doing this makes it easier to know how many storage containers you need and what sizes later on.
Stick to broad categories e.g. “Stationery” instead of “blue pens” and “red cardstock”.
8. Organize What’s Left
When you’ve finished getting rid of clutter from your junk room, take a look at everything you’re keeping. Purchase transparent storage boxes, organizers and shelving units suitable for the items that are left.
Clear boxes and organizers allow you to see exactly what’s inside which makes it easy to keep track of everything.
If necessary wipe dust off items using the microfiber cloth and put them in storage boxes according to the broad categories created in the last step. For example, all the Christmas decor goes into one box and stationery in another. Label each box clearly so you or anyone else can find what they need.
9. Clean the Junk Room
Once everything is inside the storage containers, clean the junk room thoroughly. Brush away cobwebs from ceilings and crown molding, dust shelves, furniture or any large objects. Then, vacuum and mop the floors.
10. Pack the Items Away
Pack away all of the storage containers. Place bulky and heavy items on or close to the floor.
Make sure you only need to move one other item to access another. If you have to shuffle several things out of the way to reach something else, you’ll never go for the thing that’s at the back of the shelf or cupboard. Also, you’re less likely to put back the things you had to move so your junk room will get messy again in no time.
11. Tidy Up
Grab the box of items that belong elsewhere in the house and put those away, along with any supplies you used like the Post-It notes and vacuum cleaner. Remove the trash bags.
Take all the items to be donated to the nearest charity or thrift store or schedule a pick-up. Take photos and list the items for sale.
Don’t put these tasks off. The longer you do, the least likely it is that you’ll get to them.
12. Set Limits
Now that you see how much stuff you have, set some space limits for yourself.
What I mean by this is, if you currently have a small storage container dedicated to candles (weird example but I couldn’t think of anything else), you can decide if that’s enough for you. So, anytime you go out, you know your allotted candle storage space is full so you can’t buy anymore until you’ve gotten rid of ones you already own.
This is a great way to stay accountable and keep your junk room in order. Doing this is especially important for anything you’re prone to get carried away with.
Declutter Before and After Photos
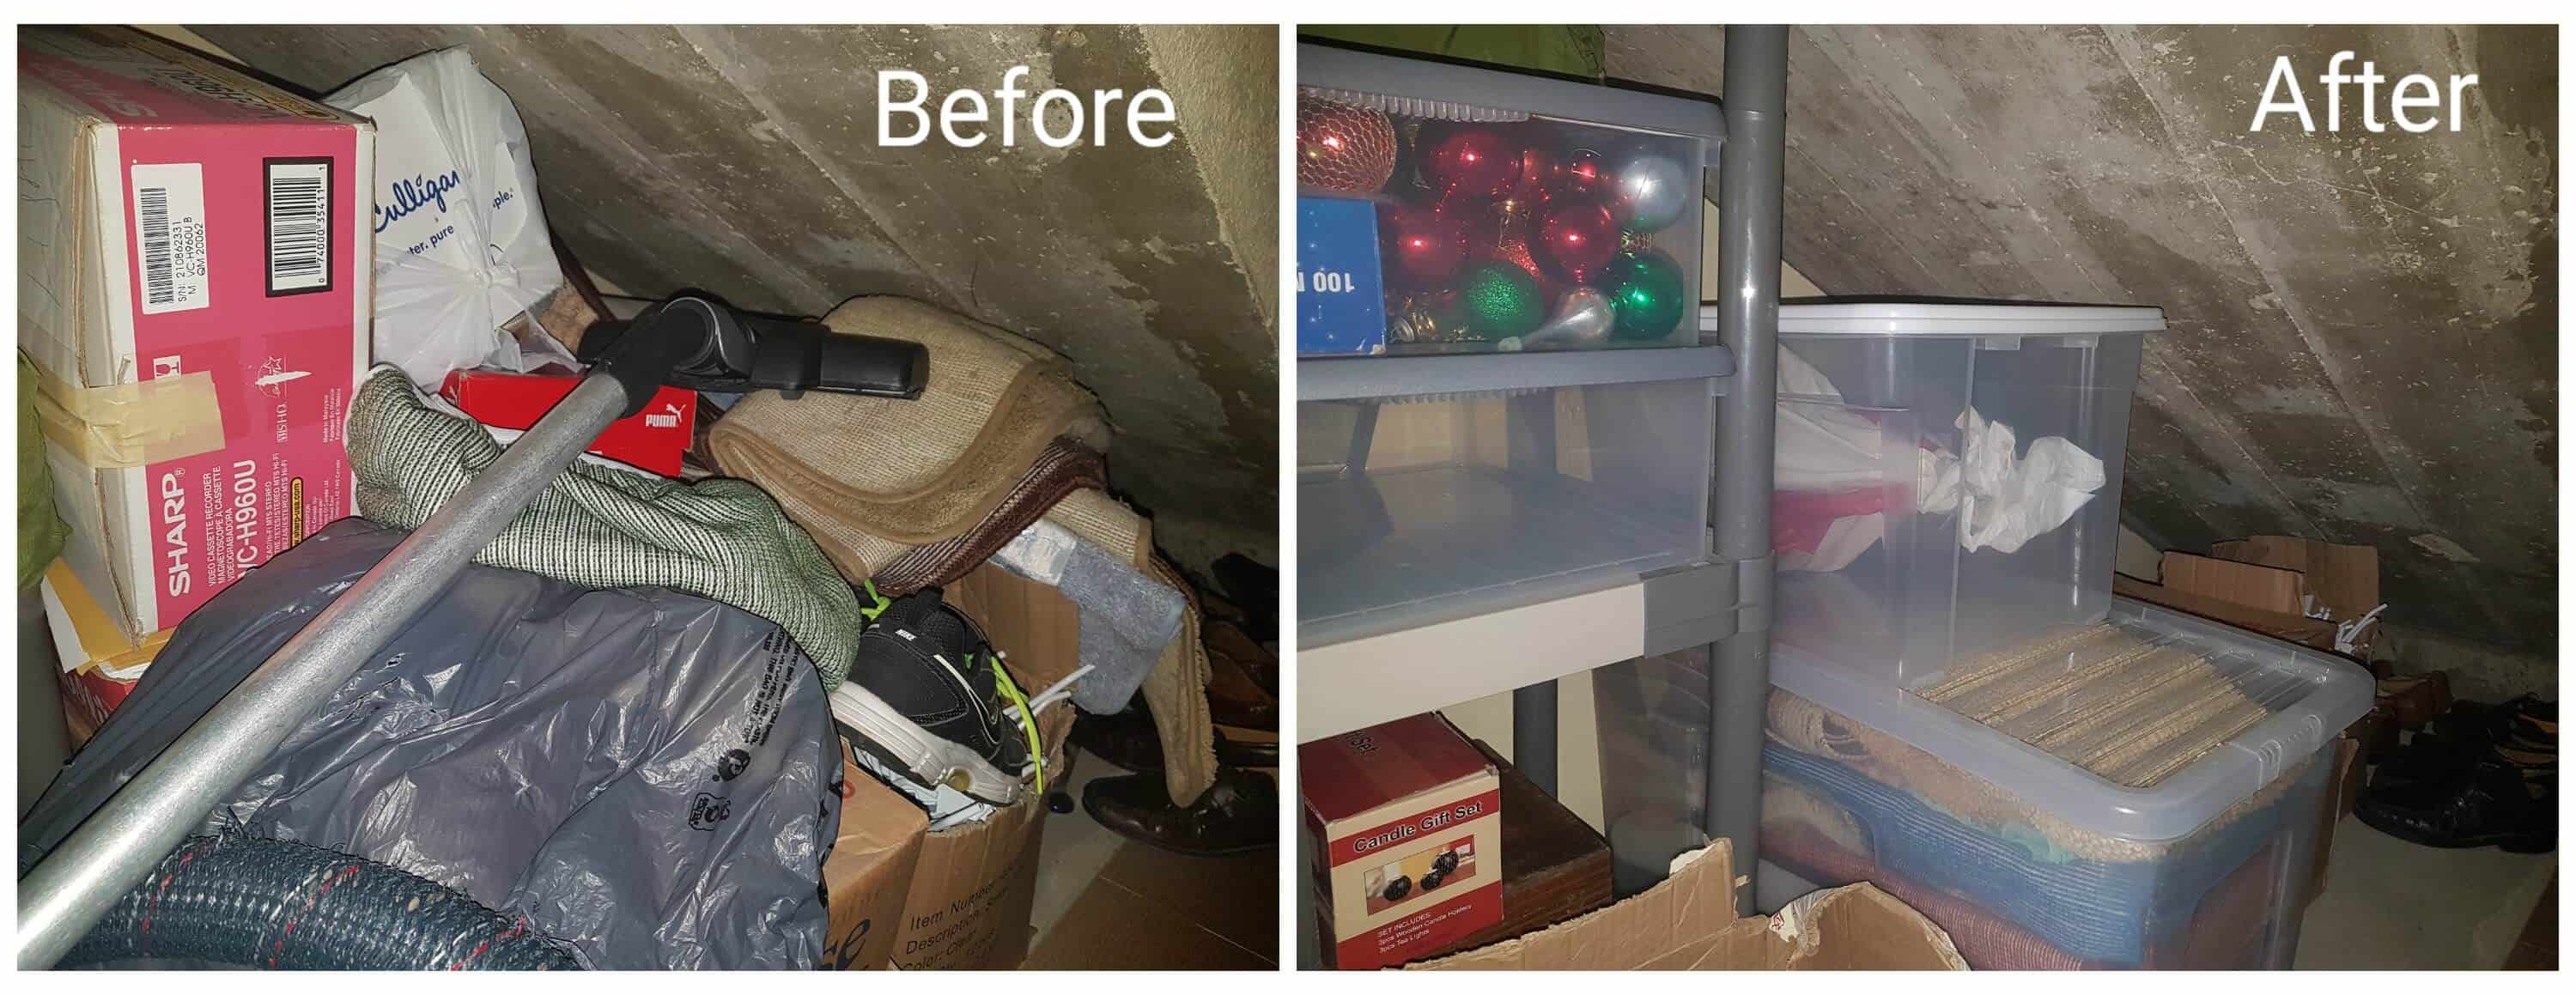
Below are some photos of the storage space I cleaned out.
No-one knew what was really in there. Everything was packed in cardboard boxes or plastic bags. The boxes were stacked high on top of one another and in front of each other. It was almost impossible to access items and because of this, everyone just threw things on top of the pile.
Now to be fair, my mother used to clean this space out once in a while, so it wasn’t always this bad. But, she hadn’t done it in some time because she just didn’t have the energy to deal with this mess anymore.
The problem was she used to clean the area but never really took the time to purge. So, she was just spending time organizing clutter.
Here’s one part of the storage space under the stairs:
And this is the back wall…
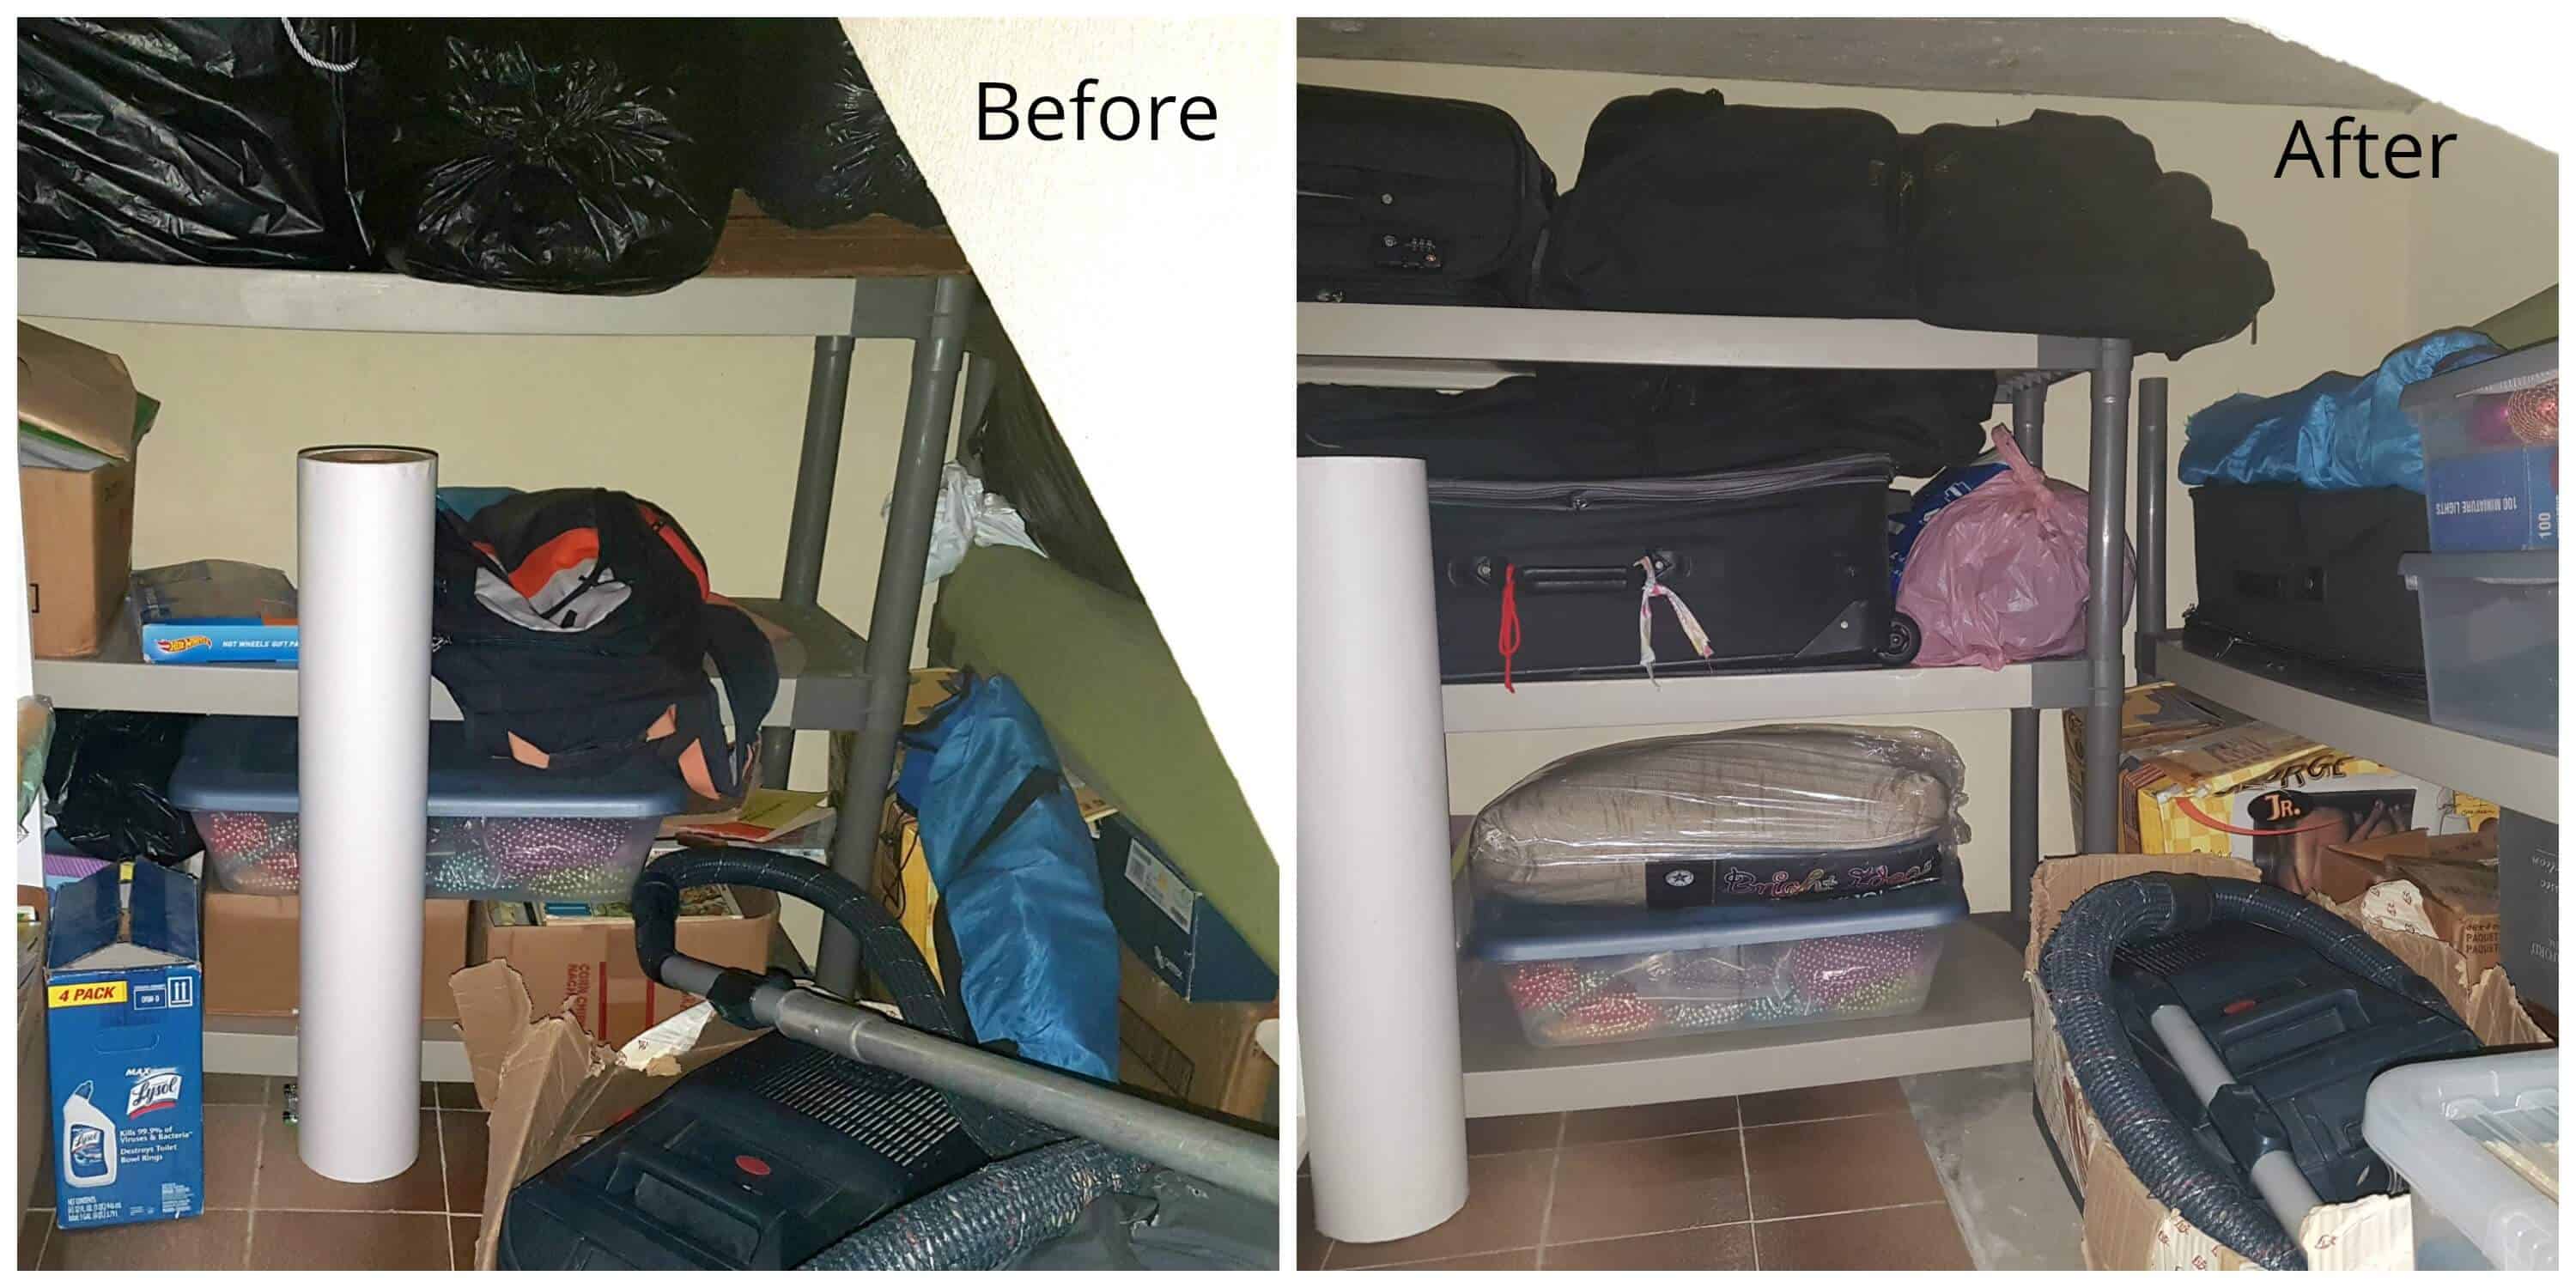
I wish I had gotten a better angle of the wall on the right in the “Before” photo. There was junk piled to the ceiling — suitcases, boxes etc.
After I took the “After” photo, I tucked the items in the plastic bags into one of the suitcases. They’re carry-on bags so that worked. I had forgotten to move those before I took the picture. And later, I labelled the storage boxes.
I did leave a few home décor items in their original boxes and just stacked them neatly on a bottom shelf. They were better protected in there with the styrofoam to prevent them from breaking.
The difference between how the space looked before and after is night and day. Now, you can see everything that’s there and easily access items.
So, there you have all my best tips for clearing clutter and how to clean out a room full of junk.

